
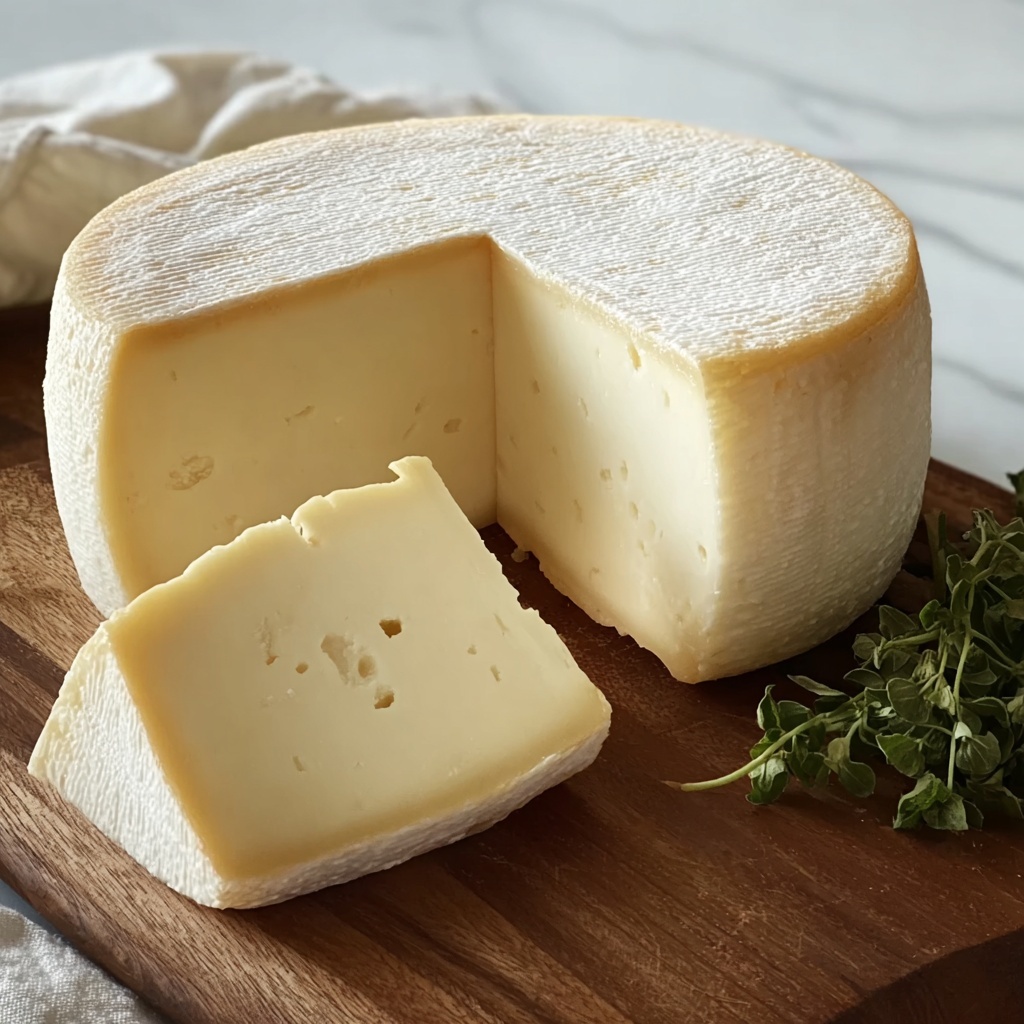
If you’ve ever imagined crafting your own fresh dairy delight right in your kitchen, this Incredibly Delicious Homemade Cheese Recipe is going to blow your mind. It’s a simple yet rewarding process that transforms just a few basic ingredients into a creamy, flavorful cheese that’s perfect for spreading, snacking, or cooking. The beauty of this recipe lies in its fresh, natural taste and the satisfaction of making cheese yourself—you’ll quickly see why it’s become a personal favorite for gatherings and cozy nights in.
Ingredients You’ll Need
Getting ready to make this cheese is a joy because it uses simple, kitchen-friendly ingredients that each add their own magic. From the richness of fresh milk to the tangy brightness of apple cider vinegar, every component plays a pivotal role in creating the perfect flavor and texture.
- 1.5 liters of milk (6 1/3 cups): Choose whole milk for the creamiest and most luscious final cheese.
- Salt, to taste: Essential for enhancing and balancing the cheese’s natural flavors.
- 2 tablespoons apple cider vinegar (30 ml): The secret agent that curdles the milk, giving the cheese its gentle tang and texture.
- 50 grams melted butter (1/4 cup): Adds richness and smoothness to the cheese, helping it feel indulgent.
- 1 tablespoon Provencal herbs (15 ml): A fragrant blend of herbs that infuses the cheese with a delicious, aromatic twist.
How to Make Incredibly Delicious Homemade Cheese Recipe
Step 1: Heat the Milk
Begin by pouring your 1.5 liters of milk into a large saucepan and place it over medium heat. Stir occasionally as the milk warms up. This part requires patience but watch closely because right before boiling, tiny bubbles will form along the edge. This subtle bubbling is your cue to proceed—don’t let it boil over, or you’ll lose that sweet fresh milk flavor.
Step 2: Add Vinegar
Once your milk is beautifully heated, stir in 2 tablespoons of apple cider vinegar gently. As you do, you’ll notice the milk starting to curdle—a wonderful transformation where the milk separates into curds and whey. This is a key moment and the foundation of your homemade cheese’s texture and tang.
Step 3: Let the Milk Sit
Turn off the heat and let your curdling milk rest for 10 to 15 minutes. This little pause allows the curds to fully develop, ensuring your cheese is firm and ready for the next step. It’s like letting dough rise—patience pays off here.
Step 4: Strain the Curds
Time to strain! Using a fine-mesh strainer or cheesecloth, carefully separate the curds from the whey. You’ll end up with lovely, soft curds that form the base of your cheese, while the whey can be saved for smoothies, soups, or simply discarded if you prefer.
Step 5: Mix in Butter and Herbs
Place the curds into a mixing bowl and add your melted butter and Provencal herbs. Stir gently but thoroughly, incorporating these rich and fragrant elements evenly throughout the cheese. This step gives your cheese a unique personality and depth of flavor.
Step 6: Season with Salt
Salt is king when it comes to flavor. Add it thoughtfully, mixing well so the cheese tastes just right. Remember, seasoning is personal, so feel free to adjust this until it sings to your palate.
Step 7: Chill the Cheese
Transfer your curd mixture into a mold or small dish, smoothing the top. Refrigerate the cheese for at least an hour. This cooling phase helps the cheese firm up and develop its final texture—a step you won’t want to skip.
Step 8: Serve and Enjoy
Once chilled, your homemade cheese is ready to steal the spotlight. Spread it on crusty bread, dollop it on crackers, or use it as a star ingredient in your favorite recipes. Your taste buds will thank you!
How to Serve Incredibly Delicious Homemade Cheese Recipe

Garnishes
To elevate the charm of your homemade cheese, consider adding fresh herbs like chives or parsley on top just before serving. A drizzle of olive oil or a handful of toasted nuts can add exciting texture and flavor contrasts that delight your senses.
Side Dishes
This cheese pairs beautifully with crusty artisan breads, ripe tomatoes, and fresh fruit like figs or grapes. It also makes for an excellent companion to charcuterie boards or crisp green salads, making it incredibly versatile across meal times.
Creative Ways to Present
Want to wow your guests or family? Serve your cheese in small ramekins sprinkled with a pinch of additional herbs or spices, or create little cheese-stuffed peppers for a creative appetizer. The creamy texture and herbal notes give you the freedom to explore endless presentation ideas!
Make Ahead and Storage
Storing Leftovers
Keep your homemade cheese in an airtight container in the refrigerator. It maintains its freshness best when chilled properly and can last up to a week. Always check for any changes in smell or texture before using leftovers.
Freezing
While this cheese is best enjoyed fresh, you can freeze it if necessary. Wrap it tightly in plastic wrap and place it in a freezer-safe container. When thawed, the texture may be slightly softer but still delicious in cooked dishes.
Reheating
This cheese is not typically eaten warm but can be gently warmed for melting in recipes. Heat it slowly over low temperature or incorporate it into sauces where it can melt smoothly without losing its lovely flavor.
FAQs
Can I use different types of milk for this recipe?
Absolutely! Whole milk is recommended for creaminess, but you can experiment with 2% milk or even goat milk for a different flavor profile. Just keep in mind that low-fat milk may result in a less rich cheese.
What can I do with the leftover whey?
Whey is a nutritious byproduct full of protein. It’s perfect for adding to smoothies, baking bread, cooking soups, or even watering your plants. Don’t toss it away!
How can I adjust the flavor if I like stronger cheese?
Try increasing the amount of herbs or salt after tasting the cheese. You can also experiment with adding spices like garlic powder or smoked paprika for a bolder character that suits your palate.
Is this cheese safe for people with lactose intolerance?
Since much of the lactose is in the whey that’s strained away, this homemade cheese has less lactose than regular milk, but it might still affect those with severe intolerance. Try a small amount first to see how you react.
Can I make the cheese without herbs?
Definitely! The Provencal herbs add a lovely aroma and flavor, but the cheese is delicious on its own. Feel free to omit them or substitute with your favorite seasonings for variety.
Final Thoughts
Trying your hand at this Incredibly Delicious Homemade Cheese Recipe is like giving yourself a giant culinary hug. It’s simple, satisfying, and perfect for anyone wanting a fresh, flavorful cheese without all the fuss. Once you taste the creaminess and aroma of herbs mingling in each bite, you’ll understand why this recipe quickly becomes a kitchen staple. Give it a go—you might just discover your new favorite way to enjoy cheese!
Print
Incredibly Delicious Homemade Cheese Recipe
- Prep Time: 5 minutes
- Cook Time: 10 minutes
- Total Time: 30 minutes
- Yield: 10 servings
- Category: Cheese
- Method: Stovetop
- Cuisine: French
- Diet: Vegetarian
Description
This homemade cheese recipe is a simple and delicious way to make fresh, creamy cheese using milk, vinegar, and flavorful herbs. Ready in just 30 minutes, it’s perfect for enjoying on crackers, bread, or as an ingredient in your favorite dishes. With just a few basic ingredients and minimal equipment, you can create a delightful cheese that’s rich, smooth, and infused with Provencal herbs.
Ingredients
Cheese Base
- 1.5 liters of milk (6 1/3 cups)
- 2 tablespoons apple cider vinegar (30 ml)
- Salt, to taste
Add-ins
- 50 grams melted butter (1/4 cup)
- 1 tablespoon Provencal herbs (15 ml)
Instructions
- Heat the Milk: Pour 1.5 liters of milk into a large saucepan and heat over medium heat, stirring occasionally, until small bubbles form around the edges and the milk is just about to boil. Do not let it boil over.
- Add Vinegar: Stir in 2 tablespoons of apple cider vinegar gently to combine. The milk will begin to curdle and separate into curds and whey.
- Let the Milk Sit: Remove the pan from heat and let it sit undisturbed for 10 to 15 minutes to allow the curds to fully form.
- Strain the Curds: Use a fine-mesh strainer or cheesecloth to separate the curds from the whey. Save the whey for other uses or discard it as desired.
- Mix in Butter and Herbs: Transfer the curds to a bowl and add melted butter along with Provencal herbs. Stir thoroughly to evenly distribute the butter and herbs throughout the curds.
- Season with Salt: Add salt to taste and mix well, adjusting the seasoning to your preference.
- Chill the Cheese: Place the curd mixture into a mold or small dish and smooth the surface. Refrigerate for at least 1 hour to allow the cheese to firm up.
- Serve and Enjoy: Once chilled and firm, the homemade cheese is ready to eat. Serve it on crackers, bread, or use it as part of your favorite recipes.
Notes
- Do not let the milk boil to prevent burning and to achieve proper curd formation.
- Use fresh milk for the best flavor and texture.
- The whey can be saved and used in smoothies, baking, or as a nutritional broth.
- Adjust the amount of salt and herbs depending on your taste preferences.
- For firmer cheese, refrigerate longer than 1 hour.
- This cheese is best consumed within 3-4 days of making.


